Overmolding is a fascinating process in plastic injection molding that allows products to seamlessly combine two or more materials. It’s the method behind everyday items like toothbrushes with soft, comfortable grips or tools with rubber-coated handles. This process not only enhances functionality but also improves the look and feel of products.
But how does overmolding work? In this article, we will cover the basics of overmolding, the materials used in the overmolding process, and best practices for designing overmolded products.
What Is Overmolding?
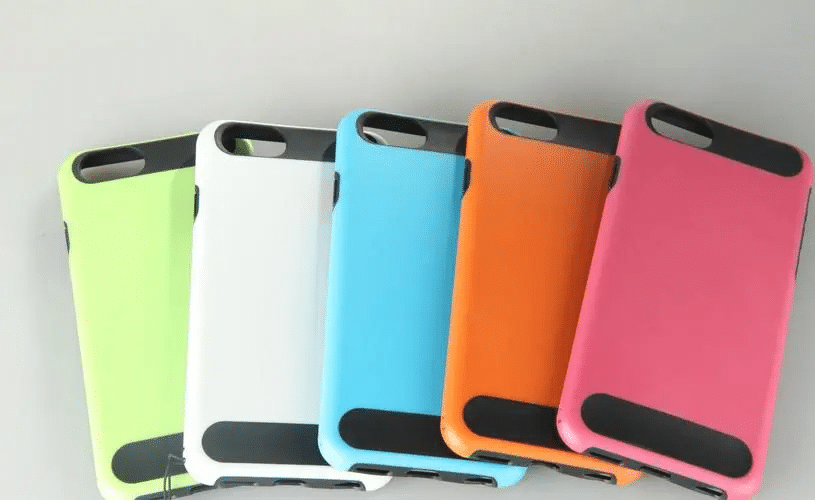
Overmolding is an injection molding process where one material is molded over another to create a single, combined product. It’s often called two-shot molding because it involves two steps.
The first step creates a base part, called the substrate, which is usually made of plastic but can also be metal or other materials. In the second step, another material, such as a different type of plastic or rubber, is molded over the substrate.
Types of Overmolding
To make the two materials join together, there are two main types of overmolding: Insert Overmolding and Two-Shot Overmolding. let’s check the details below:
Manual Insert Overmolding
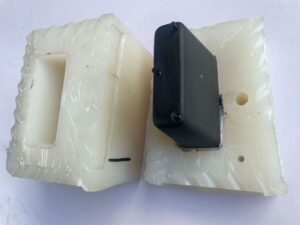
In manual insert overmolding, the base part is created first using a traditional single-shot mold. After that, the base part is manually placed into another mold and fixed in position. Then, the second material is injected over the base to complete the product.
This method simplifies tooling and reduces the lead time for the first part. However, because it involves manual handling, it is less precise. It’s ideal for producing low-volume overmolded parts.
Two-Shot Overmolding
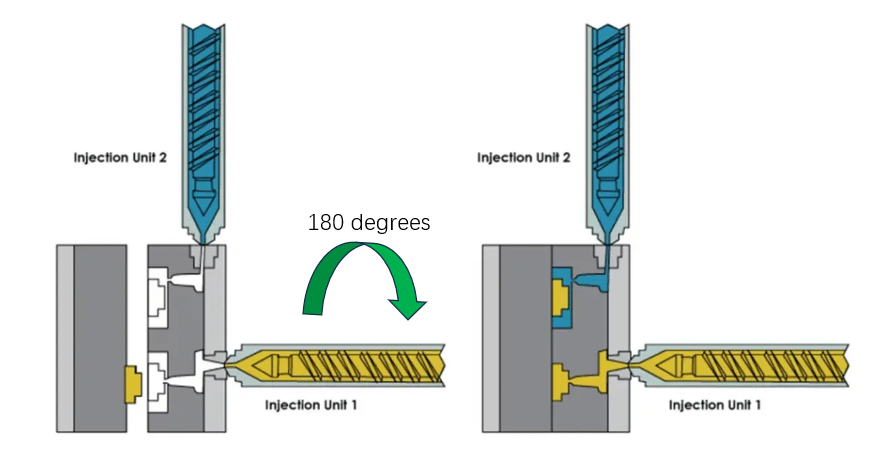
Two-shot overmolding uses a rotating mold system. The base material is injected into one side of the mold, then the mold rotates 180 degrees to transfer the part to the other side, where the second material is injected over it.
This method is faster and more accurate, making it suitable for high-volume production. It allows both materials to be molded simultaneously, significantly speeding up the process. Below is an example of how two-shot overmolding works.
Advantages Of Overmolding
Overmolding offers significant benefits across various industries, from enhancing product design to improving functionality. lets take a closer look why overmolding is so popular:
Design Flexibility
Overmolding removes the need for bulky parts like clips or brackets, saving space in the product. This extra space can be used to add new features or make the product more functional. It’s especially helpful for creating compact designs where every bit of space counts.
Cost Savings
With overmolding, two components are combined in one seamless process, reducing the need to produce and assemble separate parts. This eliminates extra steps in manufacturing, such as assembly or welding, which saves both time and money.
Improved Strength
Traditional methods, like using screws or clips, often create weak points in a product’s structure. These connections can loosen or fail over time, affecting the product’s durability. Overmolding, on the other hand, uses chemical bonding and physical interlocking to join components, resulting in a much stronger and more reliable final product.
Enhanced Appearance
Overmolding produces a seamless, gap-free connection between components, significantly improving the product’s overall appearance. There are no visible seams, screws, or fasteners, giving the final product a clean and professional look. This makes overmolding ideal for consumer-facing products where aesthetics are important, such as electronics, tools, and household items.
Disadvantages of overmolding
While overmolding has many benefits, it also comes with challenges, including design complexity, material compatibility, higher costs, and quality control issues. Understanding these challenges can help manufacturers address and overcome them effectively. let’s check why:
Complex Design Requirements
Overmolding requires detailed planning and engineering expertise. Designers must carefully consider material compatibility, bonding, and mold design to ensure the process works correctly. This added complexity can increase both development time and costs.
Higher Tooling and Equipment Costs
Overmolding requires special molds and equipment, which can be more expensive than the tools used in traditional molding. This leads to higher upfront costs, which can be a drawback for some manufacturers.
Complex Process
Overmolding involves multiple steps, such as creating the base part and then molding over it. This adds complexity to the manufacturing process and increases the chances of errors, especially when transitioning between materials.
Quality Control Issues
Ensuring that the materials bond correctly is not easy. Problems like peeling or weak adhesion can occur, requiring extra attention to quality control to avoid defects in the final product.
Limited Material Options
Not all materials can be used together in overmolding. The compatibility between the base material and the overmold is critical, which limits the range of suitable material combinations. This can make it harder to achieve certain properties or meet specific design requirements.
Materials Commonly Used in Overmolding
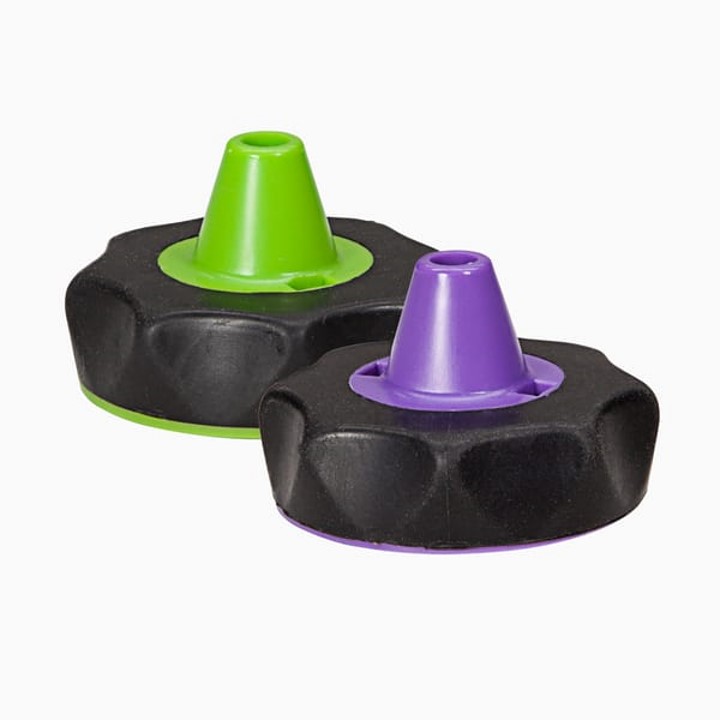
Overmolding can be used with a wide range of materials to achieve specific properties and functions. Common materials include:
- ABS (Acrylonitrile Butadiene Styrene)
- HDPE (High-density Polyethylene)
- PEEK (Polyether Ether Ketone)
- Nylon (Polyamide)
- PC (Polycarbonate)
- PE (Polyethylene)
- PEI (Polyetherimide)
- PMMA (Acrylic)
- POM (Polyoxymethylene)
- PP (Polypropylene)
- SI (Silicone)
- TPE (Thermoplastic Elastomers)
- TPU (Thermoplastic Polyurethane)
With these mateials, there are several combinations as below:
- plastic over plastic: using two different thermoplastic materials, such as a rigid plastic like PMMA over ABS plastic, combining the benefits of both materials for improved properties like clarity or strength.
- Thermoplastic over elastomer: a rigid plastic, like ABS, Combine with a flexible elastomer such as TPE or TPU. It’s commonly used for products that require both durability and flexibility, such as tool handles or medical devices.
- Silicone over plastic: a layer of silicone is molded over a plastic material to provide properties like water resistance, sealing, and a soft-touch feel, which is often used in electronics or healthcare products.
Overmolding Material Considerations
When choosing materials for overmolding, it’s important to carefully evaluate their compatibility to ensure strong, reliable parts and avoid potential failures in the final product. Here are the key factors to consider when selecting overmolding materials:
Temperature
The heat deformation temperature (HDT) is the temperature at which a material begins to soften or deform under stress, So for overmolding process, the HDT of base material should be higher than the injection temperature of the second material to prevent any deformation during the overmolding process. If the base material is not able to withstand the heat of the second injection, it can warp, lose strength, or fail to bond properly with the overmolded material.
Thermal expansion
The coefficient of thermal expansion (CTE) measures how much a material expands or contracts when it is heated or cooled. For a successful overmolding process, the CTE of both the base material and the overmold material needs to be similar.
If the CTE values of the two materials are significantly different, they will expand and contract at different rates when exposed to temperature changes. This mismatch can create stress at the interface between the materials, potentially causing warping, cracking, or delamination.
Bonding
The primary goal of overmolding is to ensure that the two materials bond effectively together. To achieve a strong bond, it’s essential to choose materials that are naturally compatible and can easily adhere to each other. This means the materials should have similar surface properties and chemical characteristics that promote bonding.
However, some materials may have difficulty bonding with one another due to differences in surface texture or chemical makeup. In such cases, you can improve the bonding process by incorporating design features such as indents or undercuts in one of the materials. These features help to physically lock the two materials together, improving the bond and ensuring a stronger, more durable final product.
Shrinkage Rate
The shrinkage rate refers to the amount a material contracts as it cools and solidifies after injection. In the overmolding process, to ensure consistent dimensions and reduce stress after injection, the shrinkage rate of the two component materials needs to be similar.
Overmolding Material Compatibility Chart
To save time when selecting materials for overmolding, we’ve created a Material Compatibility Chart. This chart helps you quickly identify suitable material combinations based on their properties, making it easier to choose the right materials for your overmolding process.
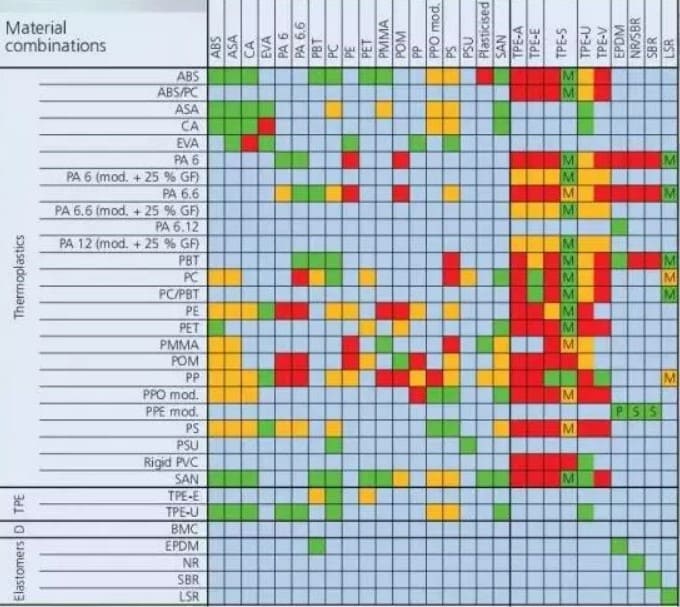
- Green= Good bonding
- Yellow=Poor bonding
- Red= Bad bonding
Best Practices for Designing Parts for Overmolding
Following the right design guidelines is crucial for ensuring a successful overmolding process. By applying best practices, you can create good parts. Let’s take a look at some of the key best practices for designing parts for overmolding:
Bonding Surfaces
- Increase the area of the bonding surface to improve bonding strength, as shown in the picture below.
- When the bonding surfaces are too small, use mechanical interlocking structures to improve bonding strength.

Design Matching Surfaces
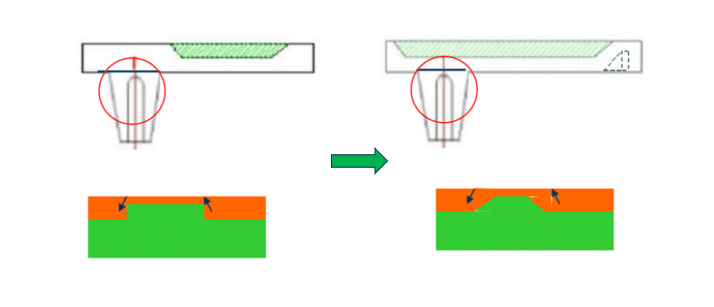
When the joint area between two components is visible, to avoid burrs in the joint area during the injection, make a step as below pictures to let the product surface match with tooling steel perfectly to avoid burrs.

Keep Uniform Wall Thickness
Make uniform wall thickness in all the areas including corners to avoid shrinkage. this guideline works for all injection molding processes including overmolding.
Ensure a sufficient draft angle
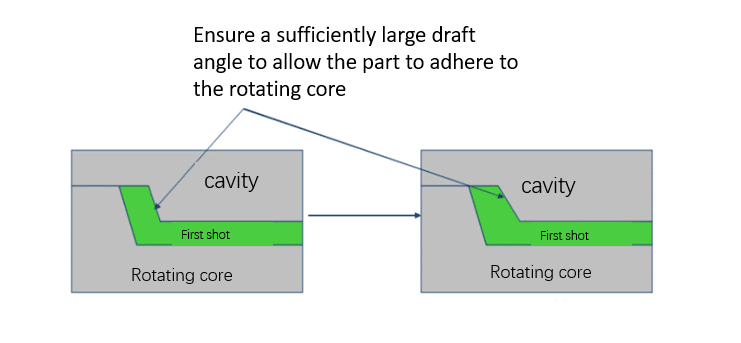
Ensure a sufficient draft angle as in the below picture, this is to allow the part to adhere to the rotating core during the overmolding process and easy to depart from the cavity.
Applications of Overmolding
Overmolding is widely used across various industries, including automotive, consumer goods, tools, and medical devices. Here are some typical examples of overmolding applications to help you understand how this process is utilized:
Automotive parts
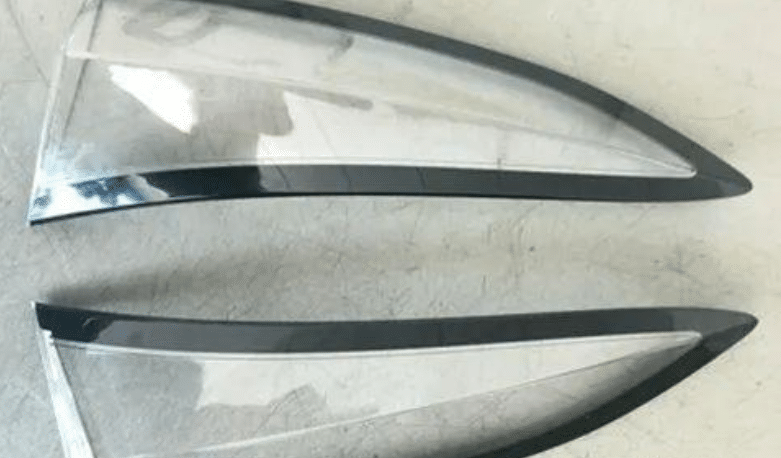
Overmolding is used in automotive lighting components, such as outer lenses, to improve both appearance and functionality. The process gives these parts a sleek, polished finish while enhancing durability.
Handheld Tools
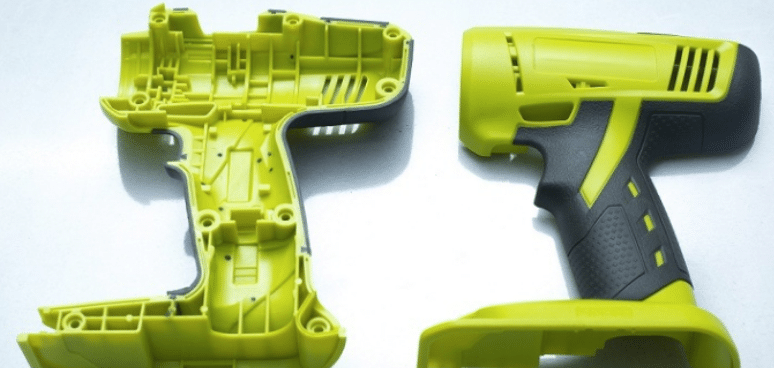
Items like toothbrush handles, power tool grips, wrenches, and thermos cups often use overmolding to provide a better user experience. The soft, rubber-like overmolded layer makes them more comfortable to hold, improving ergonomics and grip.
Consumer product
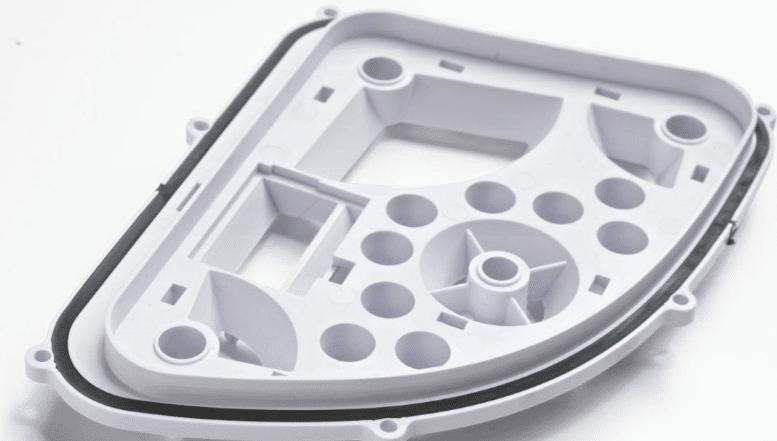
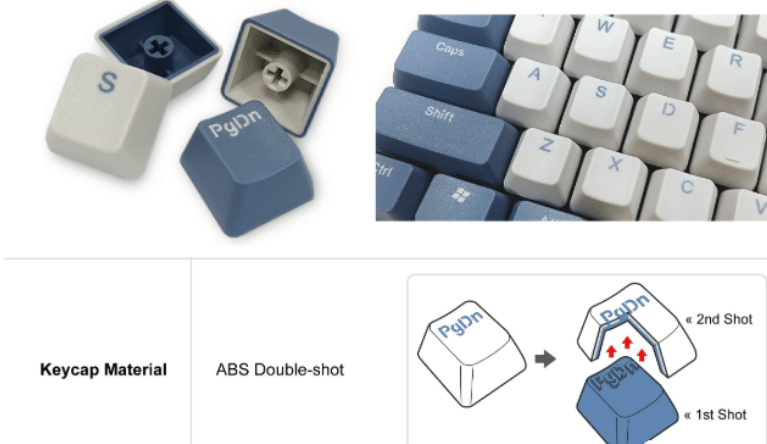
Overmolding is commonly used in products like keyboards, where it serves both aesthetic and functional purposes. The process allows for multi-colored designs while ensuring durability and wear resistance.
Medical Devices
Overmolding is often used in medical devices like syringe grips, handles for surgical tools, and patient monitoring equipment. The process provides a combination of durability, hygiene, and comfort, ensuring that the devices are both safe and easy to use in clinical environments.
Conclusion
In summary, overmolding offers great flexibility in product design, allowing for the combination of different materials to enhance both functionality and aesthetics. At KUSLA, our team of experts is ready to assist you with incorporating overmolding into both the design and manufacturing stages. With the support of our prototype inejction molding service, we can help you achieve the best results for your products.
FAQ
What is the difference between overmolding and 2K molding?
The key difference between overmolding and 2K molding lies in the number of materials used. 2K molding typically involves exactly two materials for a single part.
In contrast, overmolding offers more flexibility, as it can mold two or more materials for a single part. While the number of materials may vary, the basic process is similar, and it often uses the same types of materials as 2K molding.
What is the alternative to overmolding?
An alternative to overmolding is insert molding. In this process, a pre-placed insert, usually made of metal, is inserted into the mold before the plastic is injected. The injected plastic then flows around the insert, encapsulating it. This creates a single molded part that integrates both the plastic and the insert.


