Material hardness refers to a material’s ability to resist being deformed or damaged. It is an important factor to consider when selecting materials for metal products. Hardness is particularly critical in environments where small particles can cause wear on the material. Soft materials can get dents or marks, while harder materials are better at maintaining their shape.
Choosing the right material for a part is essential to ensure it works well in its intended environment. That’s why testing the hardness of a material before production is important. In this article, we will explain what material hardness is, how it is measured, and how to compare different hardness units.
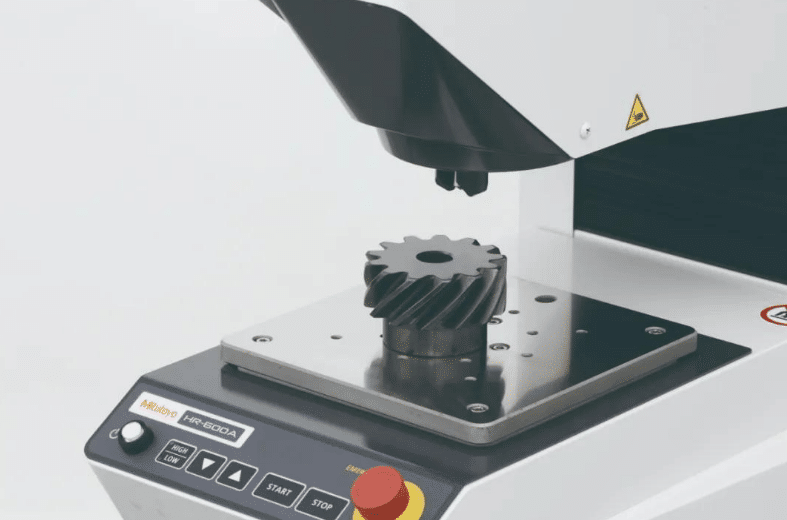
What is Material Hardness?
Hardness is the ability of materials to resist localized permanent deformation, also called plastic deformation. In most cases, localized deformation is caused by mechanical indentation or wear. Therefore, material hardness often includes various meanings, such as the material’s ability to resist scratching, cutting, abrasion, indentation, penetration, and more.
When we say a material has high hardness, it means the material can maintain its shape even when exposed to forces like scratching, indentations, or wear. For example, materials like titanium and diamond are much harder than plastic.
Types of Material Hardness
Materials react differently depending on the type of force they are under. For example, a metal that handles a big one-time impact very well might not do as well under continuous pressure.
There are three types of hardness: scratch hardness, indentation hardness, and rebound hardness. Each type requires a different tool to measure. Also, the same material can have different hardness values depending on which type is being tested. Let’s now take a closer look at the details of each type:
Scratch Hardness
Scratch hardness refers to a material’s ability to resist scratches and surface wear. These scratches happen when a harder material comes into contact with the surface, causing small deformations and material loss.
Scratch hardness tests are usually done on brittle materials like ceramics and minerals, which don’t change shape easily. This type of hardness is measured using the Mohs Scale, which ranks materials based on how easily they can be scratched. For example, diamond has the highest value of 10.
Indentation hardness
Indentation hardness refers to a material’s resistance to permanent changes in shape when a continuous force is applied. This is the type of hardness most engineers and metallurgists focus on, as metals are often exposed to constant pressure in real-world use.
Indentation hardness tests are very common in many industries because materials are frequently subjected to continuous loads. This hardness is usually measured using the Rockwell Scale.
Rebound hardness
Rebound hardness is related more to how a material bounces back after being hit, rather than how it permanently changes shape. When a material is struck, it absorbs energy and then returns some of that energy to the tool.
To measure rebound hardness, a diamond-tipped hammer is dropped onto the test material, and the bounce of the hammer is recorded after it hits the surface. One of the most popular methods for measuring rebound hardness in metals is the Leeb Rebound Hardness Test (LRHT).
Key Factors Affecting Material Hardness
Material hardness is not an isolated property; it is influenced by a variety of factors, from its internal composition to external environmental conditions. Here, we list some key factors:
Material Composition
The chemical makeup and internal structure of a material are critical in determining its hardness. For example, in metals, adding certain alloys can increase hardness, while the arrangement of crystals in ceramics and polymers affects their ability to resist deformation.
Heat Treatment Methods
The way a material is treated and processed can significantly change its hardness. Heat treatments like quenching and tempering can make metals harder by changing their internal structure. Similarly, the cooling rate, annealing, and work hardening processes all play a role in affecting the hardness of different materials.
Environmental Conditions
External factors such as temperature and humidity can also influence the hardness of materials. Generally, higher temperatures can reduce hardness due to thermal expansion and weaker strength. On the other hand, lower temperatures may increase hardness in some materials. Humidity can also affect materials like polymers, where moisture absorption can lead to changes in hardness.
What is material hardness test?
Now that we understand what material hardness is, let’s talk about hardness testing and how it’s done.
A hardness test is a way to measure the surface hardness of a material by applying a known force to it. This helps us understand how strong the material is and how much pressure it can handle before it changes shape.
Material Hardness Test Methods
There are different types of hardness tests, each designed for specific purposes. The four main material hardness test methods are the Brinell hardness test, Rockwell hardness test, Vickers hardness test, and Leeb hardness test. Let’s go through each one in detail.
Brinell hardness test
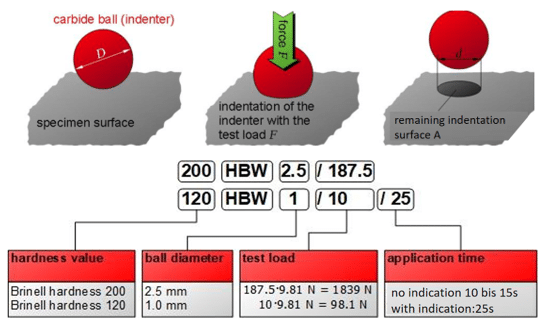
The Brinell hardness test uses a hardened steel ball or a cemented carbide ball with a specific diameter (D) as the indenter. This ball is pressed into the surface of the material using a known test force (F). After a set amount of time, the test force is removed, and the indentation left in the material is measured by its diameter (d). The test force is divided by the surface area of the indentation, and the result gives the Brinell hardness value, represented as HBS (for steel ball indenter) or HBW (for carbide ball indenter). The unit of measurement is kilogram-force per square millimeter (kgf/mm²) or Newtons per square millimeter (N/mm²).
The difference between HBS and HBW lies in the type of indenter used. HBS refers to a hardened steel ball, which is used for materials with a Brinell hardness value below 450, such as mild steel, gray cast iron, and non-ferrous metals. HBW, on the other hand, uses a carbide ball and is for materials with a Brinell hardness value below 650.
Rockwell hardness test
This test uses a diamond cone with a cone angle of 120° or quenched steel balls of Ø1.588mm and Ø3.176mm as the indenter. The material is subjected to an initial load of 10kgf, followed by a total load of 60, 100, or 150kgf. The specimen is pressed with successive loads, and after the final load is applied, the hardness is determined by measuring the difference in indentation depth. This difference is observed between the indentation left when the main load is removed and retained, and the indentation under the initial load.
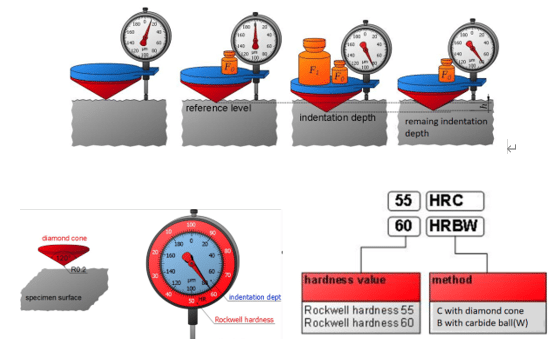
The Rockwell hardness test uses three different test forces and three types of indenters, creating a total of 9 combinations. These combinations correspond to 9 different types of Rockwell hardness, which are used to test a wide range of metal materials. The three most commonly used types are HRA, HRB, and HRC. Below is a table that explains the differences between these three types.
| HardnessSymbol | Indenter type | Total test force F/N(kgf) | Hardness Value | Application |
|---|---|---|---|---|
| HRA | 120°Diamond cone | 588.4(60) | 20~88 | Carbide, carbide, Shallow surface hardened steel |
| HRB | Ø1.588mmQuenched steel balls | 980.7(100) | 20~100 | Annealed steel, aluminum alloy, copper alloy, cast iron |
| HRC | 120°diamond cone | 1471(150) | 20~70 | Quenched and tempered steel, deep surface hardened steel |
Vickers hardness test
The Vickers hardness test uses a diamond square pyramid indenter, with an included angle of 136° between opposite faces, to press into the surface of the material under a specified test force (F). After maintaining the force for a set time, the test force is removed. The hardness value is calculated by averaging the pressure per unit surface area of the square pyramid indentation. This value is expressed using the symbol “HV”.

Leeb Hardness test
The Leeb hardness test uses an impact body with a tungsten carbide ball head of a specific mass to strike the surface of the specimen with a certain force, then rebound. The rebound speed varies depending on the hardness of the material. A permanent magnet is attached to the impact device. As the impact body moves up and down, its surrounding coil generates an electromagnetic signal that is proportional to the rebound speed. This signal is then converted into a Leeb hardness value, represented by the symbol “HL”.
Hardness Conversion Chart
Each type of hardness test discussed earlier has its own measurement scale. The units used are specific to each method, so they cannot be directly compared. However, a conversion chart can be used to help compare different hardness values. As mentioned, some common units for hardness measurement include Brinell Hardness Number (HB), Rockwell hardness numbers (HRA, HRB, HRC, etc.), Leeb hardness values (HLD, HLS, HLE, etc.), and Vickers Hardness Number (HV). Below is a chart that compares these measurement methods.
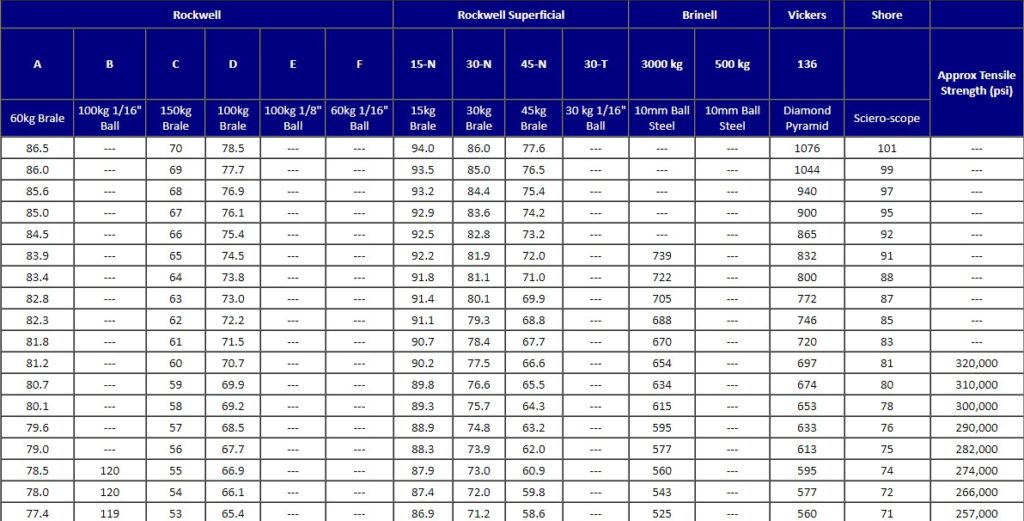
PS: You can look up more data on https://www.carbidedepot.com/formulas-hardness.htm
Common Material hardness chart
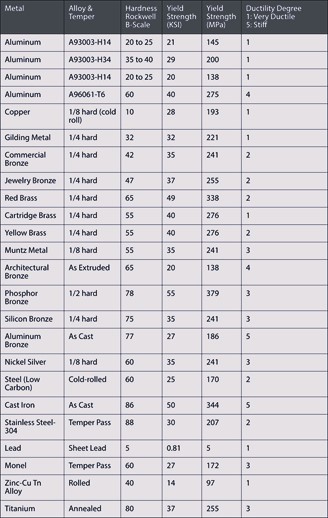
A material hardness chart helps you quickly find the hardness of common materials. It shows hardness values for different materials using various testing methods. For example, the chart may list the hardness of metals like aluminum and titanium using the Brinell scale. If your material is on the chart, you don’t need to test it yourself. Here, we share a common materials hardness chart:
Material Hardness Testing Standards
There are different standards for each hardness testing method. The most widely accepted standards come from ASTM (American Society for Testing Materials) and ISO (International Organization for Standardization). These two sets of standards are very similar for each type of hardness test, but there are small differences, such as the minimum thickness required for the sample. Below are the common ASTM and ISO standards for the four most popular hardness tests used in metallic materials:
- ASTM E 18-2012 Test methods for Rockwell hardness and Rockwell surface hardness of metallic materials
- ASTM E 10-2012 Brinell hardness test method for metallic materials
- ASTM E 92-82 (2003) Vickers hardness test method for metallic materials
- ASTM E 103-84 (2002) Rapid indentation hardness test method for metallic materials
- ASTM E 110-82 (2002) Test method for determination of indentation hardness of metallic materials using a portable hardness tester
- ASTM E 384-2006e1 Test method for micro indentation hardness of materials
- ISO 6506: Similar to ASTM E10, it covers Brinell hardness testing for metals.
- ISO 6507: Details the Vickers hardness test for metallic materials.
- ISO 6508: Like ASTM E18, it covers Rockwell hardness tests for metals.
- ISO 4545: Covers Knoop hardness testing for metals.
Conclusion
It’s important to conduct the right material hardness test when choosing the best material for your project. There are different methods to test material hardness, and we can help you find the best one for your product. KUSLA Prototype is a leading provider of aluminum machining services from China. Our team includes quality control experts skilled in testing material hardness, as well as highly qualified engineers and machinists. We work together to create your product with precision, using advanced machining technologies.
FAQ
What material has good hardness?
Materials known for their excellent hardness include diamond, cubic boron nitride (c-BN), carbon nitrides, and ternary compounds like B-N-C. These materials are widely recognized for their ability to resist wear and maintain their shape under high pressure.
Which material has the highest hardness?
Diamond is the hardest material found on Earth. On the Mohs scale of mineral hardness, it ranks at 10, making it the hardest naturally occurring substance. While other materials, like cubic boron nitride and certain synthetic materials, can also reach high hardness levels, diamond remains the hardest of them all.


